We all know that the highest quality and useful material For interior design any room is a tree. Lamps made from this material are especially beautiful. This is due to the fact that correctly selected lamps in combination with wood provide a soft and pleasant light, just suitable for rest and relaxation. Where else can we relax if not at home?
It is worth noting that while possessing unquestionable advantages, such products are quite expensive. But if desired and with due diligence, such a lighting device can be made with your own hands. At the same time, you can save a lot of money and get a unique and beautiful chandelier.
Why tree?
IN modern world, where plastic has begun to play an increasingly important role, and wood has faded into the background, it still does not intend to give up its position in the interior. Today, due to the prevalence of plastic, wood has become a more expensive and presentable material, which is not accessible to all people. This is due to the fact that wood has the following advantages:
- 100% environmentally friendly. Only wood is an environmentally friendly and natural material that undergoes a minimum of modifications during processing;
- a positive effect on the human psyche and his emotional state;
Pay attention! Pine and spruce have the best relaxing effect. Such lamps are especially useful for patients with asthma, as well as for chronic respiratory diseases.
- pliability of the material for processing. Lamps of any complexity and any appearance can be made from wood;
- positive associative series. By using wood in the interior of a room, you will achieve greater comfort and also give the room a more impressive look;
Wood and interior
- exquisite and beautiful appearance, which will fit perfectly into both modern styles, and traditional;
- the ability to change the emphasis in the room or emphasize a single design idea;
- availability of wide scope for creativity. Here, thanks to the large number of tree species, you can let your imagination run wild;
- a wide range of species to choose from for the manufacture of lighting fixtures (chandeliers, wall or table lamps);
- excellent combination of wood with other materials (glass, steel or openwork forging, paper, fabric, plastic, etc.).
The easiest way to make a lighting device with your own hands is from wood. Especially if it is a ceiling chandelier.
However, despite the rather impressive list of positive aspects of working with wood, it must be remembered that there are certain disadvantages here too. These include:
- wood can easily catch fire. You should not use light bulbs in such devices that become very hot during operation;
Pay attention! Wooden lamps most often use LED or fluorescent light bulbs, which do not create a fire hazard.
- the need to protect the material from the adverse effects of factors external environment: humidity, temperature and insects. Ceiling chandeliers are the most flexible negative influence wood insects. It is noteworthy that lamps made of pine needles or pine are less susceptible to damage by insects;

Antiseptic treatments
- high cost of material, especially rare and exclusive breeds;
- During drying, the chandelier may change its volume and also become deformed. As a result, cracks or chips may appear on the product.
These shortcomings, as well as ways to combat them, must be taken into account if you decide to make a chandelier for the ceiling with your own hands. Ceiling chandeliers, as well as other types of lighting fixtures, are quite easy to make with your own hands, especially if you know detailed instructions on this process.
What you will need
The set of what you will need when assembling a chandelier for the ceiling with your own hands may vary depending on the complexity of the design you have chosen. But the general list of what you will need, regardless of the model you choose, includes the following tools:
- a set of tools for working with wood (for carving, etc.);
- wire pliers;
- hammer and screwdriver;
- tape measure or ruler;
- drill;
- pencil;
- set of brushes.
In addition, you will need the following materials:

Decoration materials
- antiseptic agents for treating wood to make it more resistant to unfavorable factors premises;
- elements of an old chandelier: base with plinth, light bulbs, wires, etc.;
- decorative elements to give the ceiling lighting fixture the desired appearance. These can be a wide variety of things: cups, fabric, paper, badges, strings, etc.
We clarify that this is only an approximate list of necessary materials and tools. It can be easily supplemented with other devices that can simplify or improve the work ahead.
When assembling a ceiling chandelier with your own hands, you must follow the following rules:
- the tree must be protected along its entire perimeter with a special solution. This DIY ceiling chandelier will serve you for a long time without compromising its performance;
- To protect wood, you must use only high-quality products that have not yet expired. Otherwise, all your actions will come to naught in just a few years of using the product;
- take care of the system for attaching the chandelier to the ceiling. Stylized chains can be used as fastening elements. The best solution There will be a multi-point fixation system. The fact is that the design can turn out to be large and relatively heavy. Therefore, it is necessary to create maximum conditions for safety;
- When connecting the chandelier to the power supply, use the services of a knowledgeable person so as not to burn the device and avoid electrical injury.
Lamp options
Homemade ceiling chandeliers made of wood can have the most incredible shapes and sizes. After all, there are a great variety of tree species. Here everyone can show their creative talent and create something new and unique.

Various options
In our article we present several of the most popular and spectacular types of ceiling-type chandeliers. But you have the right to modify or improve them so that they are more suitable for your room interior.
Let's look at them separately
Coffee service

Creating holes
This is a very beautiful type of chandelier that can be used in both the kitchen and living room. Here we take a board as a base (ash, birch, spruce or pine is best) and carry out the following manipulations with it:
- drill holes in the board;
- cover the board with stain after it has been sanded. If oak was taken, then you can do without painting and opening it with varnish;
- We take several cups of coffee and saucers to go with them. You will also need wires and rings, an equal number of cartridges and twice as many rubber gaskets;
- make holes in cups and saucers. To do this, you need to use only a special drill for working with tiles or glass;
Pay attention! You need to drill slowly and very carefully.

The chandelier is ready
- Insert sockets with wires into the holes made and secure them;
- Next, we attach the resulting chandelier to the ceiling.
If desired, the lamp can be decorated. But the cups themselves are already an excellent decor. Remember that the main thing is to maintain the style, and not just hang on the chandelier everything that is unnecessary in the house.
If desired, such a lighting device can be hung by chains, attaching rings to the sides of the board.
The most difficult thing about such a chandelier is drilling holes in the ceramic cups and saucers, as well as connecting the product to the power supply.
In general, we can say that such a model is quite difficult to make with your own hands. But don't despair, there are much easier models to implement.
And the driftwood will come in handy

Scheme of cuts
An easier way to create a chandelier is to use ordinary driftwood brought from the forest. Moreover, light bulbs in this situation can play the role of stylized fruits, leaves or other decorative elements. The main difficulty here will be masking the wires.
The assembly of a ceiling-type chandelier made of wood in this case will proceed according to the following scheme:
- choose the branch that you like best with its curves;
- we clean its surface from excess bark, lichens and moss;
- then dry the driftwood well and sand it using sandpaper;
- choose the light bulbs that best match the stick you have chosen. Use only energy-saving and low-heat light bulbs;
- to lay the wires, we make shallow cuts into which they will later be placed;
- in case of failure, all unnecessary cuts can be easily disguised with putty;
- Light bulbs should be placed on the edges of such driftwood. At the same time, they can be placed in lampshades or simply fall from the branches. Both options will be quite original.

End result
Here you can use a wide variety of decorative elements: beads on a string, glass balls from an old chandelier, soft toys and other materials. Thanks to this, your craft will become unique, unusual and inimitable.
You can hang such a chandelier using screws or chains. In the first case, you will receive a ceiling model, in the second - a suspended one.
Other options

Country style
Another popular option is to assemble a lamp in a country style. To do this you will need irregularly shaped boards. They should be processed using the brushing technique and covered with stain. We install lampshades along the edges of the boards and, in fact, that’s it - the chandelier is ready.
In addition to driftwood and boards, you can use any household items containing wooden elements. For example, an old small wooden wheel would be an excellent option. We process it by analogy with other chandelier options:
- first we clean it from dirt;
- then process with sandpaper;
- apply stain.
After these manipulations, we run wires along the inside of the wheel, securing them with clamps. This will make them invisible. Next, we either make holes for the cartridges, or hang them at a short distance from each other.

Wheel chandelier
For ceiling mount For such a lighting device we use a powerful mounting system. This is due to the fact that the lamp will be quite large and weighty. Therefore, it would be best to place the chandelier on chains.
As you can see, almost any wooden object can be used to create a ceiling lighting fixture on your own. It could even be half a wheel, various old wooden lamps, hand carvings from wood, or other crafts. That’s why such lamps are good if you want to move away from ordinary lamps and get something original and unique. In recent years, the handmade style has become very popular. One of its main advantages, along with uniqueness, is the complete environmental friendliness of the manufactured products. And a chandelier made of wood in this case is the best confirmation.
Making a ceiling-type chandelier from wood with your own hands is quite possible, using a wide variety of materials. Don’t forget to treat the wood with special protective agents, and in all other respects, just make your desires and fantasies come true. Be consistent and you are guaranteed an excellent result at the end of the job!
Nothing adds coziness to your interior like objects made of wood: tables, bedside tables, beds or pleasant, pleasing things to the eye - crafts, paintings and other little things. Have you ever thought how stylish and homely lamps made of wood will look?
4 master class on how to make a chandelier from wood - very stylish and modern!

Watch the master classes offered below, evaluate the photos of finished wooden chandeliers - you will be amazed by the ease of manufacture and the elegance of the forms. Such DIY wooden chandeliers will look harmonious in any room - from the hallway to the bedroom, moreover, they can be hung on the veranda or in the garage - they will emit warm, romantic diffused light everywhere.
What makes up the geometry of the room? From the placement of walls, furniture, tulle, paintings... Add more style to your room by introducing the geometry of a chandelier! Such a stylish ceiling lamp made from wooden slats It’s not difficult to make but looks very impressive.


Materials and tools
- 18 wooden slats (posts);
- construction stapler with staples;
- metal pendant for a chandelier;
- metal paint;
- jigsaw;
- ruler;
- pencil.
Installation process
Let's prepare the frame of the chandelier - wooden posts. They will be natural in color.
- Let's cut first 4 identical high columns- according to the height of the chandelier.
- Then let's make 8 more - for transverse inserts.

Step 2: We make the frame of the chandelier.
- Let's make the first frame. Let's take it 2 long guides, put them parallel to each other, 2 short - across between them and fasten in all corners construction stapler.
- We also use a second pair of long slats. It turned out to be 2 frames. Using the same stapler we connect them with others cross slats. It turns out to be a kind of cube.


Let's add a designer touch to the frame - we'll lay another diagonal rail through each side of the cube. To do this we will cut one corner of the rail at 45 degrees and apply it to one of the sides for fitting.

Step 3.
- Mark with a pencil and cut off with a jigsaw.
- We attach the diagonal with a construction stapler, as shown in the photo.
- We will do the same for the other parties.

Step 4: Attachment
The model of this chandelier does not include a lampshade, so we take a ready-made blank for the lamp - an original pendant for the lamp. Let's paint it in favorite color and leave to dry.


Step 5.
While the paint is drying, we will make a hole in the frame to secure it to the factory hanger. The diameter of the hole should not be much larger than the diameter of the pipe so that the lamp does not fall through.
But in any case with inside you need to tighten the washer or proprietary limiter.


When the suspension is dry, we fix it to the ceiling, then put on the lamp frame, tighten the limiter and screw in the light bulb.

Looking at this chandelier, you will understand that you would not find it in any store. It will become a favorite decoration of even the simplest and smallest room and will definitely be an artful addition to your home interior.

These master classes are intended for anyone who would like to learn or improve their skills in making practical, unique and quite elegant wooden chandeliers with their own hands. The advantages of these products are that wood is easy to process, it is safe, because all conductive parts are hidden in insulated housings, and you can fit chandeliers made by yourself into any interior!
Master class No. 2. Designer chandelier made of wood
A simple creative lamp made of wood can be used as a night light, if you make it so that little light passes through, or as a chandelier, with fewer stripes.

Materials and tools:
- very thin wooden plywood or thick sheets of paper (the main element of the lamp);
- glue for wood or paper (PVA);
- clamps or clips (useful only during the process);
- a wire with a socket and a plug (if it is a lamp from a general power supply);
- pencil;
- scissors or paper knife.
Chandelier assembly
If you don't have ready-made strips, you can cut them from a piece of thin plywood or thick paper. You can mark the strips with a pencil or cut them straight away, because they don’t have to be the same. Any design solutions are welcome!

Glue the strips together. We make a rim of the desired diameter from each strip and glue it overlapping with PVA or wood glue.
It is better to glue it right away, creating the final design of the chandelier, since it will be difficult to make one shape from rims of different diameters at the end. Insert strips between others and fasten them together with clamps.

- It is necessary to make a mount for the socket and lamp. Use energy saving light bulbs and when the power is on, do not touch the electrically conductive parts of the cartridge.
- Let's cut it out square piece of plywood and make a hole in it for the cartridge. To do this, you need to circle the inner diameter of the cartridge so that later it does not slip through.


- We cut a hole with a knife and fix the cartridge in it.
- We drag the wire through the lamp, taking into account how it will hang.
- Then we fix the cardboard itself with the socket in the lamp using glue, as shown in the photo.

To dry, secure the plywood with two clamps. Let's leave it for a while.


When the glue has dried, remove all clamps. All that remains is to hang the lamp you made with your own hands, where it will delight you every day!


Master class No. 3. Wall lamp made of wood
If you like bright electric light and the romance of simple details, watch this master class. Nothing complicated, but original and stylish. A very simple wall lamp made of wood in a loft style.

Materials and tools:
- wooden bracket (can be purchased at home improvement stores, such as IKEA);
- cartridge with plug and textile cable;
- spray paint on wood;
- old box or newspapers;
- signets.

Manufacturing technique
Take an unnecessary box or spread newspaper to paint the bracket. It is better to do this with gloves so as not to get dirty. Spray paint over the entire surface. If the color saturation after the first painting does not satisfy you, leave the part to dry, then cover it with a second layer and leave it to dry again.

We insert a textile wire into the hole in the bracket and make one turn around the bracket. Textile wire is a unique highlight of this lamp, but you can use any wire.
We insert the other end of the wire into the socket and make zero and phase wiring in it.
We secure the bracket to the wall with screws or dowel nails. Screw the pear-shaped light bulb into the socket and insert the plug into the socket. How lovely! And in the evening, when these light bulbs - single source light, they create a romantic mood of a summer evening.


Master class No. 4: Lamp with wood veneer
Fantastic flexible pendant light wood plywood will serve as a decoration for a dining room or bedroom; its rounded shapes and neutral colors will complement any interior.

Materials and tools:
- a piece of flexible plywood board (its length determines the height of the chandelier + a small piece for fastening);
- 2 wooden hoops (you can use hoops of the same or different diameters);
- office or construction clips;
- glue gun (hot glue);
- long ruler;
- pencil;
- knife or large scissors.
Lamp manufacturing technology
Step 1: Prepare the cartridge mount.
- We take a hoop of smaller diameter and a piece of plywood board. Place the hoop on the board and trace the inner diameter with a pencil.
- Cut out a circle (or almost a circle - a piece sufficient to secure the lamp).
- In the center of the circle, cut out a smaller circle - the diameter of the cartridge.
- Take hot glue or wood glue and glue the circle with the hoop.

Step 2.
We take the second piece of flexible plywood and fix it on the table for accurate measurements. Take a ruler and pencil and draw parallel lines - approximately 2 cm wide.
But you can make the stripes as wide as you like - narrower or wider depending on your preferences.
We cut the plywood into equal strips. We will need 4 additional strips to adhere the rims to each other. These strips will be shorter than the others (almost half as long).

Step 3.
- We fix 4 short stripes on lamp. To do this, use one clamp to hook one strip on the small hoop from above and a second clamp from the bottom on the large hoop.
- We repeat this procedure on 4 sides, as shown in the photo (in order for the chandelier to be level, the hoops must be positioned strictly parallel to each other).

Step 4.
- We attach the remaining strips in the same way, starting with four on all sides, and then filling the voids between them (this should be done for overall symmetry).
- The strips should be equally curved so that the appearance of the chandelier resembles a lantern.
- Latest 2 strips must be left to hide the clips.
- We glue them one at a time - each according to the diameter of the hoop. You can glue it overlapping - it will be invisible.


All that remains is to hang the lamp and secure the socket in the hole. The air lamp is ready!
Modern interior design is not only about correctly arranged stylish furniture and the color scheme that predominates in the rooms, but also in proper lighting. Lighting devices allow you to focus on certain areas of the room, visually enlarge the space or, conversely, give the bedroom or living room more comfort and warmth.

Today, crystal wall sconces are no longer a sign of wealth and luxury, but wooden lamps are actively regaining their former popularity. Few people know that in the 16th century, it was structures made of trees that were installed in temples, palaces and houses of wealthy officials. Of course, there was no LED lighting in those days, and instead of energy-saving lamps, the rooms were illuminated with candles placed on wooden branches.
In 2010, a tornado hit New York City, leaving behind mountains of broken branches and fallen trees. Young designers Harris Hine and Amily Visclocky wanted to draw public attention to this topic by creating lamps from found driftwood, but instead revived the long-standing forgotten style. Thanks to this idea everything more people started to engage in such know-how and you, too, can easily create unique sconces ( wall lamps) with your own hands. Photos of ready-made and interesting lighting devices can be found in huge quantities on the Internet, but we will outline some of the features of such designs below.
Advantages and disadvantages of wooden sconces
In addition to their stylish appearance, such lamps can safely be called environmentally friendly. Not only does the tree not emit any harmful substances, it will also, on the contrary, saturate the air in the room with useful aromatic resins, making breathing easier. Another plus is the ease of processing the material. If for the production of plastic and metal structures If special equipment is used, a wooden lamp will require tools that are found in almost every home.
Wood is strong and durable, especially if it is treated with special impregnations.


If we talk about the disadvantages of such structures, then it is worth paying attention to the following nuances:
- Wood burns well, so using incandescent lamps in such designs is not recommended. Otherwise, the contact in the lamp socket may burn out and the entire lamp will burst into flames in a matter of seconds.
- Insects actively attack such lighting products.
- Wood is a hygroscopic material. This means that it accumulates and absorbs moisture well. To prevent the structure from deforming and serve for many years, it is better to use such a lamp at a constant temperature and humidity. Based on this, you can hang a sconce above the bed in the bedroom, but installing such lighting fixtures in the kitchen or bathroom is not recommended.
Healthy! Cedar is the most moisture-resistant species, and additional treatment with special solutions will give it even more resistance to temperature changes and moisture.

As you can see, before working with wood, it is necessary to prepare a design for the future lamp and calculate it in such a way that the lamps are located at a distance from the tree. Let's consider several options for such sconces and ceiling chandeliers.
Wood design options
The sconces in the living room interior, photos of which are presented in the article, look very cozy and homely. For this room, you can create a very stylish lamp that can be mounted on the wall or used as a table night light.
One option for creating a lamp is a sconce made from wood and a broken water pump. The resulting result looks very stylish and will suit lovers of design that includes unusual devices used for purposes other than their intended purpose.
An unusual lamp will be made from the floor of a dried tree trunk, coated with varnish, and pieces of colored crystal glued to it. This lighting fixture can be hung horizontally, vertically or used as a floor lamp-night light.
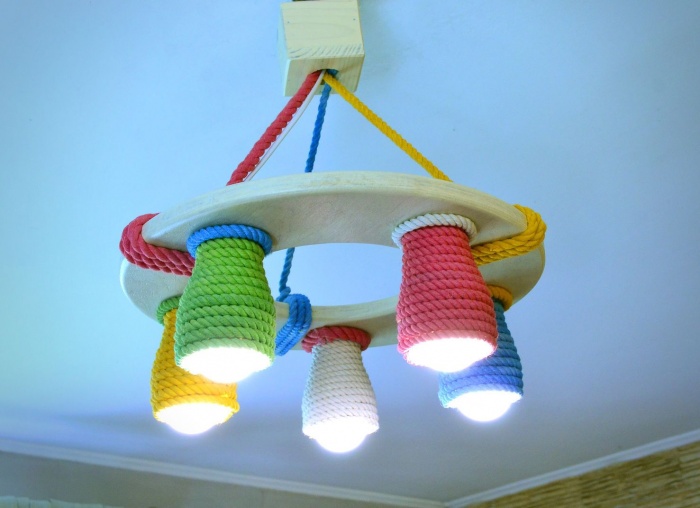
Stylish chinese lantern can be made from a broken lamp, bamboo and coconut fiber rope. This is a fairly simple design that looks very impressive both in the house and on the porch or in the gazebo. By attaching a wooden hook to the bamboo, you get a multi-functional sconce on which you can hang plants.
You can make a sconce from wood with your own hands very simply. To do this, you will need a wooden plank that can be given any shape. A kind of hook will be attached to it, on which the lamp will be placed. It will require sticks of the same diameter and length, which we will fold according to the principle of a wooden well or house, which children usually build from pencils. The result will be an unusual lamp, as if from ancient fairy tales.
A creative lamp can be made from a pine branch, a garland and a curtain rod holder. This device is also multifunctional, as you can hang decorations, scarves and much more on the branches. The garland's bulbs do not heat up, so this sconce will not light up, and to create it you will not need any skills in conducting electricity.
A wall lamp for a nursery can be made from wooden plank in the shape of a cloud and LED lamps. The resulting night light looks very beautiful on the wall, since the light is scattered as if from under a cloud.
Using your imagination, you can make a very creative lamp for a country house, apartment or garden. You can use everything that, as you thought, has not been used for many years and is practically getting ready to be “thrown away.”
What to pay attention to when creating a lamp
- If you cut wood, be sure to always wear a protective mask. Sawdust can cause an allergic reaction.
- If there is only one light bulb in the lamp, then two wires will come from it. The phase is connected to a switch, from which a conductor will go to the input phase. Zero ( blue) is connected immediately to the input zero.
- If the lamp has 2 or more lamps, then there will be more wires, but the connection principle will remain the same.
The optimal placement of sconces depends on the type of room, for example:
- The height of the sconce above the bed in the bedroom should be 1.2-1.6 meters from the floor.
- In the nursery, it is better to place the lamp so that the child cannot reach the light bulb.
- In the corridor it is recommended to place it at a height of 2 meters from the floor. If the ceilings are low, then you can hang the sconces lower - at a distance of 1.8 meters.
- Optimal height The location of the sconce for the living room is 1.3-1.4 meters from the floor.
In conclusion
As you can see, you can make an unusual lamp for a room from ordinary objects. As a result, you will receive an exclusive and stylish element interior design that will cost you a penny, but will look much more interesting than an expensive metal chandelier.
Wooden chandeliers can increasingly be seen in the interiors of country mansions. What is the reason for such popularity of such lighting devices? Of course, first of all, it is important to note the environmental safety of natural wood. This useful and high-quality material is ideal for making a wooden chandelier with your own hands.
Wooden chandeliers, made of wood, fill the room with a pleasant and soft light, allowing the owner of an apartment or house to completely relax after a busy day at work.
Wooden chandeliers have excellent technical and performance characteristics. Professional interior stylists note their unique wear resistance, as well as the possibility of making such lighting fixtures with their own hands.
Attention! A high-quality wooden chandelier has enough high cost.
It is not necessary to spend money on buying a ready-made lighting device, because you can easily make it yourself, turning your creative ideas and original ideas into reality.
In addition, a DIY wooden chandelier is a guarantee of uniqueness and individuality.

Reasons for choosing wood for making a lamp
In our age of scientific and technological progress and innovative technologies, have become widespread polymer materials, which pushed natural wood into the background. Despite the variety of finishing and decorative materials offered by lighting manufacturers on the modern market, interior designers continue to use natural wood in their work.
Original wooden chandelier with your own hands, step by step instructions, as well as photos can be found in the video:
Natural wood has certain advantages. For example, this natural material retains its original characteristics during mechanical processing.
Advice! For relaxation, professionals recommend choosing spruce or pine for making a wooden ceiling chandelier. Doctors recommend choosing such wooden chandeliers for people with chronic respiratory diseases, as well as for asthmatics.

Also among the advantages natural wood Let's highlight the ease of its processing. If desired, you can make antique or modern wooden chandeliers, and of any degree of complexity.
When choosing wood to decorate the interior of a living space, you can make it cozy and harmonious.
Wooden ceiling chandeliers will help add an accent to the room and emphasize the main idea chosen for decoration.
Advice! In order to put into practice creative fantasies, you can experiment with the selection of wood species.

For example, antique wooden chandeliers can be made from oak or larch, and modern options lighting fixtures are made from pine.
Among the advantages of choosing wood to create ceiling chandeliers, professional stylists note the excellent combination of this decorative material with other decor options: glass, plastic, metal, fabric.
Disadvantages of wooden ceiling lamps
It would seem that with such a huge number of positive characteristics, wood should be an ideal option for the manufacture of ceiling lighting fixtures. But unfortunately, even wood has some significant disadvantages that should be mentioned.
Wooden chandeliers are easily flammable, as wood is not resistant to high temperatures.
Attention! It is strictly forbidden to use light bulbs in such chandeliers that will heat up during operation.
For safety reasons, professionals working with this natural material prefer to choose luminescent or led lamps that cannot create fire hazards.
Among the disadvantages of ceiling wooden chandeliers used in rooms with high humidity, let us highlight the instability of the tree to negative influences environment: moisture, temperature fluctuations.
Ceiling lights made from wood are susceptible to insect attack.
Advice! To provide your ceiling light reliable protection against these factors, it is important to coat the finished product with a special protective impregnation.
Also among the disadvantages of choosing lighting fixtures made by hand from wood, we note their high cost. As it dries, in some cases the original appearance of the ceiling chandelier may also change.
If you take into account all these shortcomings inherent in wooden products, you can make an original and functional lighting device that will become the pride of the owner of an apartment or house.

Materials for work
To assemble a wooden ceiling chandelier with your own hands, you will need the following tools and materials:
- roulette;
- screwdriver and hammer;
- pencil;
- electric drill;
- hammer and pliers;
- antiseptic for processing wooden products;
- socket, light bulb, electric wire;
- decorative elements
Depending on which particular model of lighting fixture will be created, this list may be supplemented with other materials and tools.
There are certain rules that must be followed when starting work related to the creation of wooden ceiling chandeliers.
First of all, it is necessary to take care of the complete treatment of the material with a special antiseptic composition.

In addition, you need to pay due attention to the fastening system finished product to the ceiling surface. For example, you can choose an original metal chain so as not to be afraid that the chandelier will fall from the ceiling.
When connecting a wooden lamp, it is better to use the services of a professional electrician to avoid emergency situations.
One day you will want to be transported to an atmosphere of harmony and peace. Nothing decorates interiors more than using natural wood. This trend will always be fashionable, the most favorite material of designers for decorative and finishing works. Looking for proper lighting For your home, feel free to choose wooden chandeliers. You can hang such an “antique thing” both in a country mansion and in a museum, restaurant, or apartment.


Peculiarities
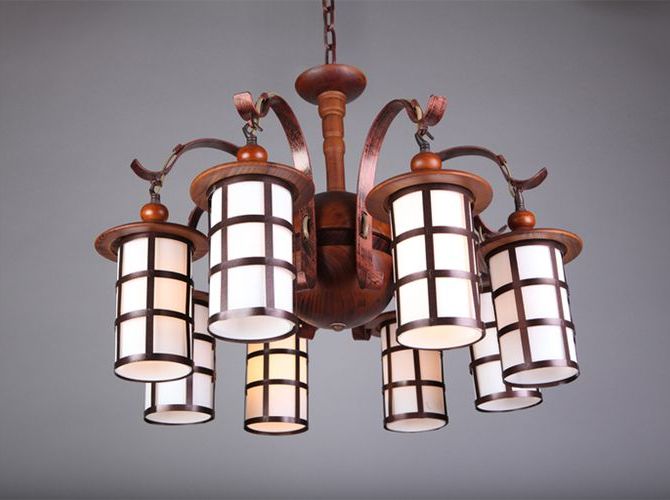
Whatever style you are a fan of, wooden chandeliers will harmoniously fit into the atmosphere of bedrooms, living rooms, and halls. Japanese, Chinese, vintage or eco style are most suitable to embody your design idea. Despite their massive size, wooden chandeliers bring a sense of peace of mind to any room.


Wooden lamps represent a somewhat rough, clumsy work of a craftsman. You can successfully combine cart-shaped models, wheels with lamps that imitate candles. There are a huge number of LED lamps and incandescent lamps for them on the market. Country or antique stylized cafe, bathhouse, hotel reception, as well as home interior, will instantly be transformed with such an accessory.
You can choose beautiful pendants, ceiling structures. An absolute must have are huge castle, large and miniature models. They can be made entirely of wood, have only a few metal elements and vice versa
Obvious advantages Wooden chandeliers are considered:
- environmentally friendly, non-toxic natural material;
- a wide range of wooden collections various breeds;
- ease of processing and installation;
- instant transformation of interiors even in modern styles (kitsch, loft, urban chic, etc.);
- combination with many materials (metal, glass, textiles).

Despite the increased flammability of wood, poor “contact” with rooms where there is an excess of humidity, frequent temperature changes, a wooden chandelier is still popular. It “wins” over other devices with its aesthetic qualities.
Special impregnations help to avoid delamination, deformation of wood, the appearance of insect pests, and accidental fire.
A reliable and practical pendant lighting fixture has become a real symbol of luxury. It is he who sets the general mood of the room and successfully emphasizes strengths interior


Combination of materials
Particular attention should be paid to the combination of wood with other materials. Feel free to combine natural wood with metal, glass, stone, paper, all kinds of draperies, and acrylic. Depending on the chosen “tandem” you will achieve certain touches in the interior decor.
They have proven themselves to be excellent during the operation of the product. from beech, oak and pine. They combine perfectly with metal elements. With such a device, the notes of Gothic, Middle Ages, and strict classics will sound in your home. Glass and solid wood construction will evoke loft, country and rustic motifs. Provençal “duets” made of wood and textiles add special comfort, romance, and touchingness.


When buying a wooden chandelier, pay attention to what its components are made of:
- decorative fittings (models come with forging, with a wooden hoop, carved, they can be decorated with both textiles and bronze);
- diffusers (plafonds, lampshades);
- type of fastening (metal hook, durable bar, can withstand heavy weight);
- the lamps themselves, their shape, sizes, etc.

In style interiors baroque, rococo, bourgeois, empire chandeliers made of aged wood have proven themselves excellent. Even the smallest models will become the main accent of the interior, setting the right mood for guests and owners of an apartment, house, or restaurant.


By choosing wooden lamps from hardwood, you will enjoy the beautiful texture and color scheme of the entire model range.
By giving preference to pine, you will receive a dizzying aroma of pine needles and will have a real device for relaxation and healthy sleep in your home. Luxurious pine products provide comfortable lighting throughout the room.
The chandelier itself can be made of high quality plastic with wooden frame. This is a bold attempt to combine several stylistic directions and even eras. Such products will harmoniously fit into modern interior styles (minimalism, eclecticism, kitsch, country, etc.).


A wooden chandelier on chains adds a special charm to the room. It can represent an elegant wenge-colored beam, a barbell, or even a ship's steering wheel. There are a huge number of varieties of shapes and sizes.


Models and types
The desire to live in a pirate room, to feel the spirit of the Middle Ages or the avant-garde is a matter of taste. So, 3-horned ones will look elegant ceiling lights with textile lampshades, pyramid-shaped products, etc. Before purchasing a wooden chandelier, decide on the type of model:
Suspended structures must be equipped with a suspension in the form of a chain or cable. The product cannot do without a durable metal hook. You can purchase a similar type of wooden chandelier for rooms with a ceiling height of 2.5 m.


- Ceiling models will be attached above the head due to mounting plate. You can choose designs made entirely of solid wood or with some wooden elements.
When did you find best option for the ceiling, it is also important to choose the right type of light bulbs. To avoid fire, it is better to opt for LEDs or energy-saving fluorescent products. Fireproof, they will not heat up during operation.

- In combination with natural wood The textile looks perfect. Lamps with lampshades- a symbol of warmth, comfort and hospitality. The overall atmosphere of the interior will depend on what print you choose for them. Checks, polka dots, abstract patterns, small floral patterns, strict geometry - try to combine the colors of furniture, curtains and other elements with the color scheme of the chandelier.


- Among the wide variety of models you can find exquisite wooden sconces for the bedroom. They are made in any form and add mystery and some mysticism to the interior. For the children's room, it's time to “arm yourself” with a funny model in a pirate style. A flat “anchor” chandelier in wenge color goes perfectly with wooden furniture, floor coverings from the board.


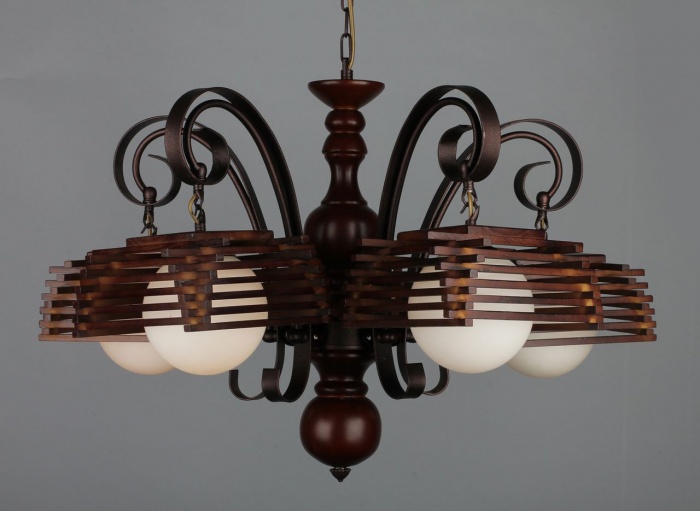
- In the kitchen, living room you can choose a classic chandelier without frills. Three- and five-horn model with faceted or frosted glass, fabric and paper lampshades give special comfort to the most “angular”, eclectic interiors.


Current styles
Designers consider the main styles into which a wooden chandelier fits harmoniously oriental, eco, country, classic and modern. But this does not mean that such an element cannot be hung in a room where the spirit of rustic, Provence, vintage, Gothic or Baroque reigns. Decor masters recommend adding notes of antiquity to offices, spacious halls and modest living rooms.
Chandeliers will fit perfectly into the concept of country, eco, oriental styles. Feel free to choose branchy ones, models in the form of a cart wheel, as well as products suspended on ropes or chains from the ceiling.


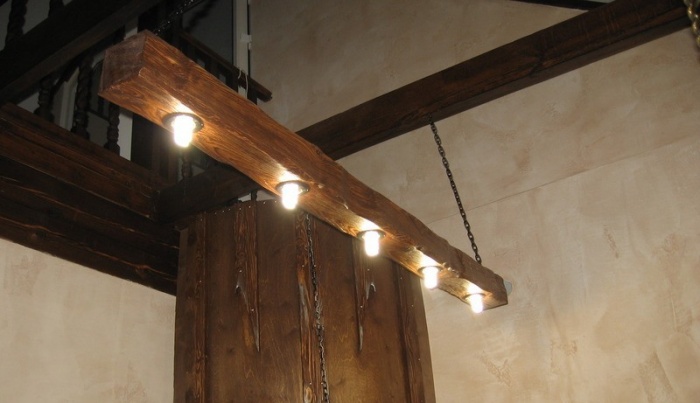
There are also antique options that can recreate a picture from the times of the avant-garde, romanticism, and the Middle Ages. Flat-shaped wooden chandeliers will look original. They should have lamps that imitate candles. You can add notes of simplicity and comfort using rustic style and chandeliers in the form of bars on a rope. It looks great in the interiors of kitchen-dining rooms and living rooms.


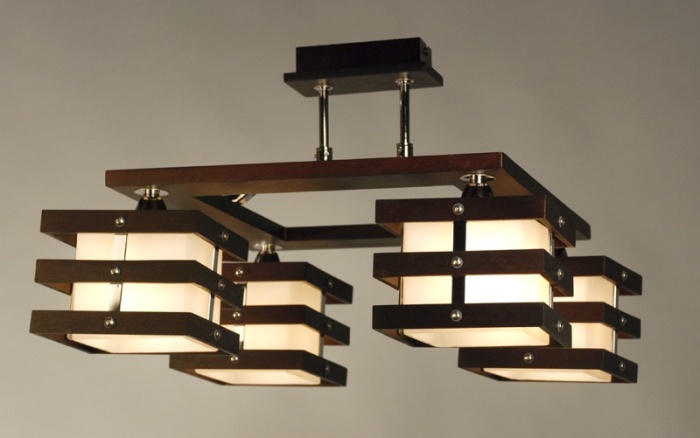
Japanese style involves the use of a wooden chandelier in combination with a material such as silk. Forged inserts and fashionable engraving add richness to the accessory. Any east direction uses the correct geometry, so your lighting fixture should have a clearly square, rectangular shape and also be symmetrical.

Antique chandeliers take you back to the past and add illusory, special magic to the room. They are ideal for designer styleschalet, Provence, retro. Try hanging vintage designs in your bedroom or living room for instant peace and tranquility. Natural material is environmentally friendly. It transfers heat well and is flexible different types processing.


Experiment with styles and shapes of models. Now is the time to install such a structure in a cottage, country mansion, sauna or bathhouse. You won't spoil general view rooms, if you hang a product made of coniferous or hardwood in the form:
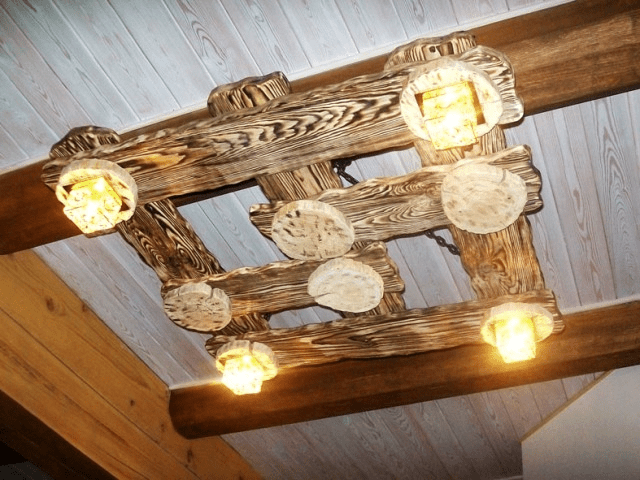
- several bars or planks;
- branches intertwined;
- boards neatly laid in a row or perpendicular to each other.


Many modern models fit harmoniously into the Art Nouveau style. Most often, designers add glass, metal or textile elements to wood. Strict and restrained options will complement the classic atmosphere, more intricate shapes will decorate the room in eclectic, eco, kitsch, etc. styles.


Pay attention to products with built-in solid wood spotlights. They will not only highlight your excellent taste, but will also become a practical, functional appliance in the home.


The most beautiful modernist chandeliers are considered to be models with frosted glass inserts. They will create a complete composition together with other elements of the room: upholstered furniture, baseboards, floor and wall coverings, and other finishing materials.
Color solutions
Partially color range try not to go far from natural shades. The wood should retain its unique texture and emphasize your love for eco-themes, classic elegance and avant-garde things. For spacious rooms, it is better to select a visible “spot” of a dark color. The black base and shades add sophistication and elegance. This option is especially suitable for offices and will emphasize the status and prestige of its owner.


Striving to classical motifs, look at the color of the wooden chandelier, like cherry, wenge, bosse, oak or walnut. But in modern interiors, cylindrical or spherical lampshades in shades of Karelian birch, cedar, mahogany, and mahogany will look original.
Light palette adds sophistication and brings a relaxed, romantic mood to the atmosphere.
Provence style can’t do without elegant designs made of vine and walnut twigs. The shade you choose should be associated with sophistication, grace and lightness. Experts advise lovers of Gothic style to “arm themselves” with models with the effect of aged wood, forged parts and openwork elements. All this should be placed in the background wooden base in dark color.


Fans loft premises, attic style, most likely, use chandeliers in the form of bars and boards. In addition to lamps and light bulbs, they can be installed glass jars, flower pot, wicker basket. It would be preferable to choose the color of mahogany, brick or dark brown. In this case, it is worth using ergonomic fluorescent or LED lamps with a long service life.

Shapes and sizes
Among the colossal variety of shapes and sizes, the most popular wooden chandeliers are round and angular. A more complex “geometry” is suitable for luxurious mansions, spacious halls, halls and will not fit into a cozy, modest kitchen, living room, or bedroom. Here it is worth looking at ceiling mounted structures in the form of a wheel or steering wheel with lamps beautifully arranged around the circumference.


For classic, gothic, medieval style, use a candle lamp with imitation of fire in the wind. And minimalism, constructivism and even techno can be decorated with the help of a square lighting fixture.


Rectangular chandeliers made of wood with uneven edges can consist of boards and bars. These elements are often connected to each other by nails, ropes, ropes or chains.


Large bulky chandeliers evoke a feeling of well-being and luxury. With such an accessory you will always feel in your comfort zone, and your life will look like a royal one. Practice shows that the place of massive lamps is in spacious rooms(restaurants, country houses, hotel halls, etc.).


Small chandeliers will fit well into the interior of an attic, loggia, small living room or dining room. Interesting solution there will be 3-arm models, options with shades made of fabric to match furniture set, upholstery, curtains or wallpaper.


Review of manufacturers
Among popular manufacturers of wooden chandeliers, the Italian brand is considered the top seller Velante. In her collections you will find both floor lamps, sconces, and tabletop appliances, spots, LED chandeliers with original case from quality material. Such models can add charm to any interior.


