A do-it-yourself well cover is a necessary element for furnishing a country or private home. Any well, be it drinking or technical, requires that its mouth be closed. Naturally, if the entire well is made with love and has an aesthetic appearance, then the cover on the well should be made taking into account the design style and external perception.
Features of a well cover
The well cover is a protective element of the outer part (head) of the well. Its functions depend on the type of structure. First of all, main task– prevent a person from falling into an open mine shaft. For a drinking well, the lid plays an important role - it protects against precipitation, dirt, dust, and hazardous substances getting into the water. In addition, it keeps water cool during the hot season and prevents it from freezing in winter. In addition, direct sunlight spoils the quality of water. In technical wells (settlements), in addition to the safety issue, the problem of sealing is solved to eliminate unpleasant odors.
If you take into account the functional features, it becomes clear that a do-it-yourself well cover must satisfy a number of requirements. Firstly, it is supposed to be sealed enough to protect against even dust and water getting inside. Secondly, it must have such a weight that it does not fall from a gust of wind or an accidental touch, but at the same time it must be easy to rise when you need to draw water. Important requirements are also mechanical strength, water resistance, resistance to atmospheric factors, including frost and exposure to sunlight, ease of use, durability and decorativeness.
Return to contents
Design features

The well can be covered modern light roof and metal.
The design of the covers for drinking and technical wells is different. For water supply facilities, the possibility of frequent and easy opening to collect water is important, which is often solved by making a door.
In settling tanks, the lid is rarely lifted, and priority is given to sealing, which is why it has a monolithic massive design.
The main materials for the manufacture of well covers are wood, metal, concrete, plastic, textolite, plywood. Such products can be solid or double, i.e., consist of two parts (closed and rising section). In turn, the solid structure is made in the form of a monolithic mass or shield.
Return to contents
Simple wooden cover
Such a system is made in the following order. A shield is made from beams measuring 4 x 4 or 4 x 5 cm - the beams are laid without a gap and secured with two bars on the wrong side. To give the shield rigidity, another bar is fixed diagonally between these bars. All gaps and joints are sealed with a sealing compound. In simple systems, the joints are closed with thin slats with inside. The outer surface is carefully polished.
In order to make a lid from wood, you need the following tool:

- Bulgarian;
- screwdriver;
- hammer;
- hacksaw;
- chisel;
- plane;
- grinding machine;
- paint brush;
- sandpaper;
- metal ruler.
The simplest design and manufacture is considered to be a solid panel wooden cover. It can have a round or rectangular (square) shape and is made of one or two layers of boards or beams, fastened together in the form of a shield.
To increase resistance to microorganisms and moisture, the wood should be impregnated with an antiseptic and waterproofing compound. For ease of maintenance, handles are attached to the shield. Appearance The cover is given by varnishing or painting. The use of stain allows for the imitation of valuable wood species. Aesthetics are enhanced by the installation of decorative handles. If it is necessary to give the lid a round shape, the shield is cut using a grinder according to a template.
Return to contents
Wooden cover with hatch

The best solution is a roof for the well, which will not become an obstacle to the collection of water and will protect the water itself from debris.
For ease of use of the well with frequent collection of water, double wooden covers are used. Such a system contains a fixed part in which a hatch is made, and opening flaps (door).
The manufacture of such a design is carried out as follows. A shield with a rectangular hatch in the middle is assembled from wooden beams measuring 4 x 4 cm. The dimensions of the hatch are determined by ease of maintenance (for example, 50 x 60 cm).
Fastening bars are installed at the border of the hatch, and additional bars are installed closer to the edge of the shield.
Hatch flaps are made in the form of small panels made of timber 20 x 20 or 25 x 25 mm and are hinged to the main panel. Handles are attached to the doors. Processing and decoration are similar to the previous case.
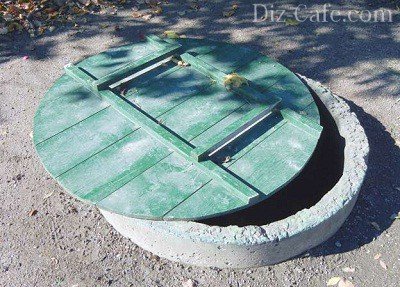
The double system, similar to the wooden one, has a hatch with a lid. Shown is an opening structure consisting of two parts - a stationary frame with a hatch and a lifting lid. The stationary part is made in the form of a frame from a 40 x 40 mm angle, onto which a steel sheet 4-5 mm thick with a central hatch is welded. A moving part in the form of a similar frame and a solid sheet is installed on top of the hinges; in this case, the casing can be made of steel sheet 3-4 cm thick or textolite 8-12 mm thick.
Return to contents
Metal cover
Tool for making a metal cover for a well:
- welding machine;
- Bulgarian;
- hacksaw for metal;
- metal scissors;
- electric drill;
- chisel;
- hammer;
- file;
- wrenches;
- paint brush;
- metal ruler;
- roulette.
The metal cover for a well can be solid or double, only metal or in combination with other materials. The simplest one-piece structure is cut from a steel sheet 5-10 mm thick, and the massive heavy system refers to settling tanks. A more complex one-piece design includes a frame made of steel angle and a steel sheet 3-4 cm thick welded to it.
Metal parts are highly durable, but are susceptible to corrosion. To protect them from rust, they must be painted, in two layers - a primer and a base coat.
In terms of decorativeness, metal hatches are inferior to wooden structures, so a combination of metal with textolite, plastic or wood is often used.
The well shaft must be closed. This is necessary to prevent debris, precipitation, and surface pollutants from getting into the water. In winter, it is important to close the well to prevent the water from freezing. Previously, beautiful wooden houses were installed above the well for this purpose. In addition to performing purely utilitarian functions, they served as decoration for the site. Some owners still consider the house to be a beautiful and practical addition to the well, while others prefer more convenient and smaller covers. How to close a well? Is it possible to make a lid yourself?
Wooden house for a well: neat, stylish and beautiful
How to protect water in a well
Most often, covers are needed for shaft-type wells. The structures can be on special supports, or they can be made in the form of simple hatches that protect the shafts from debris and precipitation.
The most popular materials for making lids
They are made from the following materials:
- Metal
Metal structures are strong and durable. Sheet metal with a thickness of 2 mm or more is suitable for their manufacture. To ensure that owners do not have problems with access to water, the structures are equipped with a convenient handle. You can purchase a ready-made lid or make it yourself. Both industrial and homemade lids must be primed on both sides and treated with an anti-corrosion compound. In addition to the functional element - the handle, forged metal decorations can be welded to the lid.
- Plastic
Polymer lids are lightweight, comfortable and durable. They are released industrial enterprises. The products are fixed on the well neck using fasteners, which are included in the package of protective structures. This is an excellent option for wells with plastic rings.
- Concrete
Concrete caps are made by pouring mortar into a special mold. In order for the finished product to be durable and serve for many years, they lay reinforcing mesh. The thickness of the lid is about 5 cm. To prevent the material from crumbling at the edges, the sides are covered sheet metal.
- Wood
Wooden well covers have been used for centuries. They are made from small boards. For the manufacture of such a structure, well-dried wood is used. Finished product should be painted or varnished.

Plastic lids practical and great looking
Design features of well covers
Protective structures for wells are made in the form of a shield or hatch. Wooden shields very convenient and easy to make. They are knocked down from boards, nailing a beam diagonally from below to strengthen the structure. To protect the shields from rotting, they are painted on both sides. Shield covers usually do not look very presentable, so they can be additionally decorated with drawings, decorative handles, etc.
Hatch covers come in single and double leaf types. They consist of two functional parts– a fixed base-shield and the lid itself. The base is made of wood, concrete or welded metal. The hatch doors are hung on long hinges.
Concrete covers can be either a solid slab or a slab with a hatch. Structures of the first type are very difficult to move due to their heavy weight, so slabs with hatches are much more practical, although somewhat more difficult to manufacture. Hatches can be wooden or metal.

Concrete well cover with a hole for a hatch
How to make a simple wooden lid with your own hands
To make the structure you need strong wood. You can use oak, elm, aspen, pine. The dimensions and shape of the lid depend on the type of well neck and the personal preferences of the owner. The number of boards is calculated depending on the size of the structure. In addition to the boards, you need hinges, hinges, and bars. The tools you will need are screwdrivers, a hammer, and a hacksaw.
How to make a shield cover
First of all, they make the sheathing. It must match the dimensions of the well neck. The sheathing is made from bars, then boards are placed on it. The timber is nailed diagonally across the covers.
As a handle, you can use wooden beams stacked one on top of the other. However, it is better to buy a ready-made pen industrial production: It will be more convenient to use and look better.
The gaps between the boards must be treated with sealant. After this, the lid is treated with drying oil and painted.

Homemade cover with hatch
To create a fixed base, boards are stuffed onto the bars so that a rectangular hole remains in the center. This will be the hatch. The bars are attached to the side walls.
The hatch doors are made according to the same principle as the base - by filling boards onto beams.
The finished sashes are hung on hinges on the side walls of the hatch. The handles are bolted to them. After this, all that remains is to seal the joints and paint the structure.
You can attach a lock to the finished lid to protect the well from hooligans and intruders. But this is not necessary. Each owner decides for himself whether locking mechanisms are needed.

Double wooden lid: closing and insulating the well
If planned double design, then two identical covers should be made. The first is then secured at the bottom of the neck, and the second at the top. This type of protective design ensures that no foreign objects or sediment will get into the water.
A double cover is ideal if the owner wants to insulate the well for the winter. In this case, straw or other insulation is placed between the top and bottom covers. Thermal insulation is mandatory for wells located in regions with harsh winters. At temperatures below -20 degrees, wells freeze.

Wooden covers for wells - design options
Is it worth installing a canopy or a house for a well?
When the well is already covered with a new lid, it can be decorated by making a canopy-roof or a closed house. You can choose the roof structure at your discretion - single or gable, flat, inclined, round. To make a decorative roof look “like a real one,” it can be finished with tiles or metal tiles.
The roof and house provide additional protection from rain and snow. Installing even the simplest canopy can protect the well cover from getting wet in the rain and extend its service life. It's not easy original decoration, but a completely functional structural element.

Well with a wooden lid and a canopy decorated with carvings
After installing the cover, all that remains to worry about is the decor. Very interesting options for decorating a well in ethnic style - straw, vines, wood carving. You can use decorative wooden structure- crane. The decoration with fresh flowers looks interesting: near the well there are flowerpots with climbing plants that entwine the source. Do not neglect color and light effects. Bright details and a cute garden lantern turn the well into a real decoration of the site.
Video: DIY well cover
Original ideas for building and decorating a house for a well can be made with your own hands using standard construction tools. The creation of a private well traditionally ends with the arrangement of a house, which is both a protective and decorative element. There are quite a lot of options for the finishing design of the mentioned structure, but the order of arranging the houses as a whole remains almost the same. Only the dimensions, configuration and design features change. Traditionally, wood is used to create houses. Read the provisions of the presented guidelines and choose the house design option that suits your case.
Why do you need a well house?
Available for sale large selection ready-made houses for wells. However, the cost of this type of product leaves much to be desired. Therefore, many owners decide to build well houses on our own– there is nothing complicated about it.

The main purpose of the well house is to protect water from various types of pollution and direct sunlight. Insects, garbage, animals, excess heat - all this negatively affects the quality of water.
The house will also provide reliable protection of the well from various types of precipitation and chemicals used to spray vegetation. In winter, a properly equipped house will not allow the water in the well to freeze.

Set for work
- Woodworking machine. This device will allow you to process as quickly and efficiently as possible. wooden blanks. If you don't have access to a woodworking machine, at least have an electric plane ready.
- Circular saw.
- Electric jigsaw.
- Hacksaw.
- Nail puller.
- Phillips screwdriver.
- Hammer.
- Pencil.
- Construction level.
- Roulette.
- Edged board.
- Beam.
- Fastening elements.
- Roofing material. Choose at your own discretion. The main thing is that the support can properly withstand the weight of the finish, and that the roof itself is in harmony with the surrounding space. For example, slate, roofing felt, and metal tiles are suitable.
- Door.
- Door latch.
- Pen.
- Loops.
Prices for popular models of jigsaws
Jigsaw
House with a gable roof

The simplest and most popular design option. Such a well house can be easily built from available equipment, because... almost everything necessary (timber, boards, fasteners) remains after the completion of larger-scale construction activities.

Frame
To create the base of such a house, boards and wooden beams are used.

First of all, you need to select optimal sizes main structural elements. If the parts are too thin, the well house may not withstand wind and other loads. Elements that are too voluminous will make the house bulky.
 House diagram. 1 – base frame, 2 – gables, 3 – pillar, 4 – roof ridge, 5 – gate, 6 – gable cladding, 7, 8 – roof slopes

Therefore, stick to the recommended and time-tested parameters. So, optimal thickness The size of the board is 4 cm, the section of the timber is 8x10 or 10x10 cm. The design of such a house consists of four posts made of timber and the same number of boards, suitable for making the upper and lower trim. The recommended width of the boards is 120-150 mm.

Saw off the boards in advance in accordance with the dimensions of your well, and then nail all the elements one by one to the support posts. As a result, you will get a reliable and even frame. To fasten elements of the mentioned dimensions, use nails approximately 100 mm long.

At this stage, it is best to adhere to the following algorithm:

Roof and upholstery
Start arranging the roof of the well house. Start by installing trusses - this is a rigid structure designed to attach the sheathing. Make trusses from durable boards with a thickness of at least 30 mm. Select the length individually - the final height of the well house directly depends on this indicator.


Prepare boards for jibs and crossbars. Material 2.5-3 cm thick will be enough. In total, you need to prepare 6 rafter legs, 3 crossbars and 8 jibs. Cut the rafters at an angle, and then connect the upper ends of the products to each other. Fasten with self-tapping screws.


For additional fixation of the rafters, use crossbars. They should be placed 30 cm below the point of the upper rafter fastening. At the junction of rafter elements with boards top harness create cutouts. Use 12 cm nails to connect the rafters and frame.

Strengthen the fixation of the rafter elements with jibs. To connect the trusses, use a kind of ridge - a structure made of two boards. Attach the sheathing boards in increments of about 15 cm. Provide 10 cm protrusions above the walls of the building. Cover the finished roof frame with roofing felt, and on top of it, if desired, fasten the finishing roofing material at your discretion. Finally, all you have to do is cover the corner joints with wind boards.


It is most convenient to assemble the roof structure frame on the ground.

Door
The door of such a well house looks like a kind of plank shield. The door is made according to an extremely simple principle. Cut boards about 150-200 mm wide. The length will be enough 85 mm.

Place the boards one next to the other and fasten them with 30x25 mm bars. Two bars will be quite enough - you fix one on top, and nail the second from below. To fasten the elements of the product, use self-tapping screws. Four screws for each board will be enough.
Nail an additional diagonal block. It will help increase the rigidity of the product. Frame the gables, attach the latch and handle, and then hang the finished door on its hinges.

Don't forget to process outer side products with an antiseptic drug and varnish. Before applying varnish, you can paint the door with waterproof paint.


Prices for various types of lumber
Lumber
Such a well house will have an original and very interesting design. To build such a structure you will need the following:

- rounded logs;
- boards for roofing and supports;
- finishing coating for roofing;
- material for arranging a gate with a comfortable handle.
Similar well houses are often found in villages. The pillars of the structure, gates and the log house itself are made from rounded timber.

Manufacturing technology
Fold the rounded timber into the log house according to the dimensions of the well. Connect the timber using any suitable and convenient method. Install two massive wooden beam supports. For additional rigidity, equip the house posts with supports. On top of the support posts, arrange a wide roof structure. The instructions for constructing the roof were given in the previous section of the instructions - do everything in the same order.

The edges of the roof should extend beyond the base of the well house. This will prevent precipitation from entering the well shaft.
Fasten the gate securely. You can decorate the protruding ends of the beam with a variety of curly cutouts.

Modification of a previous design. The only difference is the shape - it is hexagonal and allows you to save additional space, which is important for owners of compact wells and small plots of land.

In general, the sequence of construction of this house remains the same as in the case of the construction of an ordinary quadrangular building made of timber. The house is well suited for framing a shaft with pumping equipment.

Prices for popular types of antiseptics
Antiseptics
Several methods can be used to decorate a house. A popular decoration option is carving. A neat carved house will fit into any landscape, the design of which is made using wood.

Another simple and popular option for decorating such structures is painting. Varnishes and impregnations allow you to radically change the texture and color of the material.
In some situations, it will be appropriate to decorate a house using a ceramic or wooden figurine of an animal.

Otherwise, each owner must independently think through the finishing design of the well house, so that finished design fit well into the surroundings and fully demonstrated the individuality and taste of the owner.
Good luck!
Video - DIY well house
TOP 8 popular roofing coverings
| Photo | Name | Rating | Price | |||
|---|---|---|---|---|---|---|
| Piece roofing materials for roofs | ||||||
| #1 |
|
⭐ 100 / 100 |
||||
| #2 |
|
⭐ 99 / 100 |
||||
| #3 |
|
⭐ 98 / 100 |
||||
| #4 | Wooden shingles (shingles) |
⭐ 95 / 100 |
||||
| Soft roofing materials for roof | ||||||
| #1 |
|
Soft tiles |
⭐ 100 / 100 |
|||
| #2 |
|
Roll roofing |
⭐ 99 / 100 |
|||
| #3 |
|
Membrane coating |
⭐ 98 / 100 |
|||
| #4 |
|
Self-leveling roofing from mastic |
⭐ 97 / 100 |
|||


— cement-sand tiles are an analogue of ceramic roofing material. She also has an external resemblance to him. It is produced from a mixture quartz sand, cement, binders and water-repellent additives, as well as coloring pigment. Mostly high-quality raw materials are used in production. Usually this is cement from 200 and above.
- it is durable. If the material is made with strict adherence to technology, it will serve for 30 - 50 years;
- does not collapse under the influence of rain, snow, hail, does not fade under the sun;
- the material does not rust, is of sufficient thickness, does not rot or deform;
- The material is resistant to significant mechanical loads and quite durable. The risk of chipping during installation is minimal.
- has a lot of weight;
- while resistant to mechanical loads, the material cannot withstand specially applied blows;
- the facing rough surface complicates snow removal;
- the main fragments do not differ in a wide variety of shapes.
Cement-sand tiles
- is considered one of the best and respectable roofing options. This is due not only to the natural origin, but also to the excellent technical characteristics of the material. According to a number of parameters (strength, resistance to factors external environment, durability) ceramic tiles superior to many other roofing materials.

- environmentally friendly. Made from clay, it is not only safe for human health and the environment, but also allows you to create a favorable microclimate in the room;
- does not absorb moisture;
- withstands up to 300 freezing cycles, does not fade in the sun;
- easy to install;
- The service life of the material is 100 years.
- weight – 50-70 kg/m kV;
- fragility of tiles based on baked clay, inconvenient to store and transport;
- high cost.
— slate roofing not only has an attractive appearance, but also has high technical characteristics. Such a coating can last more than 200 years without losing its original properties. Slate roofing and features of luxury roofing materials.

- The service life of a slate roof is 200 years. Appearance and technical specifications the materials remain unchanged;
- does not absorb moisture;
- resistance to sudden temperature changes;
- is not subject to corrosion and deformation;
- has good thermal insulation properties.
- does not have a wide range of shades;
- the large weight of the slabs creates a high load on rafter system roofs;
- high cost of roofing.
Wooden shingles (shingles)
— designers use it to reconstruct ancient buildings or to create new objects in authentic style. The production of roofing elements and its labor-intensive installation should be trusted only to experienced builders with a high professional level.

- environmental safety, no waste during installation;
- light weight;
- harmonious combination with the environment.
- the need to process material made from hardwood, primers and antiseptics;
- leakage of roof covering;
- deformation under the influence of moisture and sunlight;
- fragility;
- annual inspection of the coating and repair of damaged areas.
Since time immemorial, the design of the well assumed the presence of a wooden house-lid in the traditional Russian style, which not only protected the water from various debris, but also served as a storage place for buckets.
The main purpose of the cover is to protect the well from the ingress of precipitation, dust, and various debris that clog drinking water.
However, over time, a do-it-yourself well cover, created in the shape of a house, lost its popularity, and water increasingly began to be extracted using pumps, relegating buckets to the distant past. Instead of houses, special covers are installed over the wells, which can easily be made with your own hands.
Functional “responsibilities” of the lid
A reliable well cover must perform several functions at once. Its purpose is to prevent debris, dust, sediment, birds and animals from entering the well shaft. The cover must be firmly fixed to the well and be able to support the weight of children playing on the surface. However, these are not all the functions assigned to the lid. Another purpose of the design is to ensure sufficient ventilation of the well. In areas where the air temperature drops below -20°C during the cold season, the lid should prevent the water from freezing.
Return to contents
Wooden structures for wells
It is very easy to make a cover for a well from wood, since wood can be easily processed, which means it can be easily adjusted to the size of the well.

- 6 wooden blocks measuring 200x300mm;
- stainless steel;
- dry hewn boards with grooves;
- pens;
- roofing material;
- hinges;
- measuring tape;
- nails, screws;
- hacksaw;
- dense rubber belt;
- hammer;
- screwdrivers.
When choosing the main material, experts recommend choosing oak, birch, pine or aspen.
Before you begin the process of assembling the cover, take accurate measurements of the length and width of the well. After this, make a crate from wooden blocks, the shape of which will completely repeat the dimensions of the creation itself. The finished sheathing is sheathed with board. To receive robust construction additionally strengthen the lid wooden beam in the center on the bottom side. In this way, two identical doors are made: lower and upper. One of them is installed in the lower part of the work, and the other in the upper part. In the cold season, you can place a straw cushion between the covers to insulate the well.

Wood is easy to process, so the lid will be easy to adjust to the size of the well.
To prevent lifting the lid from becoming a difficult and difficult task, nail or screw handles made of iron or wood to the surface of each of them. Mount the handles on the well cover until it is attached to the well.
After the covers are completely ready, they are attached to the well using hinges. You can replace the hinges with a rubber belt, to one end of which the lid is nailed, and the other end is attached to the work.
To secure the lid to the work as firmly as possible, make a sheathing of wooden blocks or metal corners along the edges of its upper and lower parts. They are the ones who will hold the lid elements.
To give an aesthetic appearance, the lid can be coated with varnish or paint. It is worth performing the procedure before attaching it to the belt or hinges.
Return to contents
Stages of installing a PCB cover
If you built a well with your own hands, then the lid for it can be made on the basis of textolite, which is a very durable but easy-to-process material. To work you will need:
- textolite;
- metal corners;
- sealant;
- profile pipes;
- hinges, handles;
- concrete;
- welding machine;
- self-tapping screws, bolts;
- hammer, screwdrivers;
- Bulgarian;
- measuring tape.

Textolite is a durable material not inferior in strength to metal. It can be easily processed with special tools.
As with the wooden lid, measure the dimensions of the creation. Taking into account the data obtained, cut the metal corners at an angle of 45°. The result will be 4 segments, from which it is necessary to obtain a metal quadrangle by welding. To ensure the frame gains strength, weld the corners on the outside and inside. Clean the marks from the welding machine using a grinder.
At the next stage, cutting of profile pipes is carried out. The length of the pipes should be 1 cm less than the length of the corners. Insert the pipe sections around the perimeter of the base into metal frame and weld to it using a welding machine. Treat the resulting weld seams with a grinder.
Make two plates from PCB, the dimensions of which will correspond to the dimensions of the frame. Install insulation between the resulting PCB sheets, then fasten them together using self-tapping screws, and cover the seams with a layer of sealant. The result is a lid that must be connected to the frame using regular hinges. To install the hinges, you can use the welding or bolting method. To install the cover from boards, form a formwork on the well and cement it. After installing the frame with a cover, cover the surface with a layer of concrete or cement. For ease of use, screw the handle to the lid.
A well in a dacha is also a source of cool water. clean water, And decorative element. If the design style of the well is integral with other buildings, the site looks more attractive. It’s not for nothing that a considerable number of summer residents place clean decorative wells– wooden, decorated with carvings, with improvised flower beds on the lid, etc. A do-it-yourself well cover can be made of various materials - wood, metal, plywood, plastic. To prevent debris, insects, and small animals from getting into the well, the lid must be tightly fixed, durable, provide air flow and, of course, be beautiful.
Wood is the most successful material for making a well cover: it looks beautiful and is environmentally friendly pure material, has excellent performance characteristics. A wooden lid, if you use decorative elements, also looks the most aesthetically pleasing.
In this case, the well is lined with narrow timber, and the bench and lid are made from it – the result is a beautiful, practical design. For convenience, the lid has hinged doors with handles so that it does not need to be folded back completely each time.
Option #1 – simple wooden lid
A decorative wooden lid can be made independently; the manufacturing process is quite simple. For the lid you need to choose durable wood - elm or aspen will do. You can also use pine, but the wood of this tree is softer. The size and shape of the product are determined according to the type of structure and neck of the well.
The easiest way is to make a cover in the form of a hatch. For making, you will need nails, hinges, measuring tools, dry boards with grooves, handles, hinges, six bars (20-30 cm for one cover), a hacksaw, a thick rubber belt, screwdrivers, and a hammer.
It is better to make a double wooden lid. This is done so that it does not freeze in winter. You can make a hinged or removable cover - what exactly it will be will be determined when drawing up a work plan.

Hinged, hinged well cover with convenient wooden handle– practical and easy to manufacture. Loops and carved handle give a simple design a decorative look
The work begins with the installation of the lathing and the necessary measurements. In order for the hatch to be firmly located in the neck, it is necessary to make a lath. It is made from bars according to the size of the neck. To cover the structure, you can use tes. Metal hinges are attached to it. The hinges can be replaced with a rubber belt - one end of it is nailed to the lid, the other to the trigger.
The simplest option for a well cover is timber sheathing, wooden boards. In conditions cold winter It is recommended to make two such covers and lay insulation between them, this will help the water not to freeze
The main functions of the second sash (if you choose this option) are additional protection and bridging gaps, if any. For strength, the lid is reinforced in the center from below with timber. A pair of identical lids is made - lower and upper. The lower one is installed in the lower part of the neck, the upper one in the upper part. In winter, a straw cushion is placed between them for insulation. If in your region the temperature in winter drops to -20 degrees or more, a double lid is required - otherwise it will freeze.
The simplest pens for wooden lid– bars stuffed parallel to each other. But for greater convenience and aesthetics, you can use ready-made wooden or metal handles. As for the castle, this is a matter of personal choice. Some people use shut-off devices to make the well more secure when the owners are away.
After making the lid, you can think about how. Traditional options two: do decorative house on poles or install flat roof round or rectangular shape. The roof can be gable in the shape of a house, flat, round, sloping - at your discretion. Can be used various materials for its decoration - natural and bitumen tiles, metal tiles, and wicker, straw, boards, slate, carved decor, etc.
Option #2 – PCB cover
The cover for the well can be made of textolite and metal corners. To make it you will need textolite, sealant, profile pipes, cement, handles and hinges, tape measure, welding machine, bolts, screws, grinder, screwdrivers and hammer.

Textolite is a durable layered material impregnated with resins. It is easy to process, and such a lid can last for a long time.
Using a tape measure, we take measurements of the work, cut the metal corners at an angle of 45 °. The resulting four segments are welded into a quadrangle. To strengthen the frame, the corners are welded on both the outer and inner sides, welding marks are removed with a grinder.
We cut the profile pipes so that their length is one centimeter shorter than the length of the corners. We insert pieces of pipes around the perimeter of the base into the metal frame and weld them to the base, the seams are processed with a grinder.
Then two plates are made from textolite, corresponding in size to the frame. A layer of insulation is laid between the plates, then they will need to be fastened together with self-tapping screws, and the seam will need to be treated with sealant. To connect the resulting cover and frame, we use hinges that can be installed using bolts or welding.
The cover for the PCB well is ready. For installation on the well, formwork is made from boards, everything is cemented. After installation, the frame with the lid is covered with a layer of cement. To make using the lid more convenient, a handle is screwed onto it. You can leave the structure as is, or you can paint it to give it a more aesthetic appearance.

Alternatively, you can make or buy a ready-made plastic lid. It can be used temporarily or permanently if winters in your region are not too cold
You can also use it to make a lid. stainless steel, however, this option is more suitable for a well made of reinforced concrete rings.
Option #3 – top for a well in the shape of a house
The lid can also be made in the form ( gable roof). First, the frame is made using the same technology as a gable roof, but of appropriate dimensions. To access the water, a single-leaf door is made on the front slope of the “house”. The frame is made of wood, it can be painted or sheathed with any roofing material– you will get a very aesthetically pleasing decorative cover for the well.

A cap for a well in the shape of a house is not only a cover option, but also an excellent decorative element. In this case, the house is made of smooth timber, the roof is finished bitumen shingles, design with double-leaf doors on hinges and comfortable handles - reliable protection for moisture source
A do-it-yourself wooden well cover is not much inferior to a ready-made one - it is a practical design for protecting the source of moisture from weather conditions and debris. By making it yourself, you will save money and also try yourself as a designer.
The options considered give an idea of how you can make a cover for a well yourself. Its production will not take much of your time, and your well will receive reliable protection.


